
Don't let Nebula V infiltrate your group's strategies for Caldera. From factories and bunkers to ammo and bombs, these ten tips will...

Season 2 of Call of Duty: Vanguard and Warzone bring reinforcements to a massive global conflict featuring armored war machines.
Season 2 also significantly increases the weapon XP rate in Warzone, as well as the XP rewards for the Daily Challenge.
While this guide doesn't detail every single change coming with Season 2 (check out Raven Software's patch notes for details), it does cover nine key additions that could offer new strategies for victory.
Here's what you need to know before you visit Caldera in Season 2, presented by Raven Software and High Moon Studios:
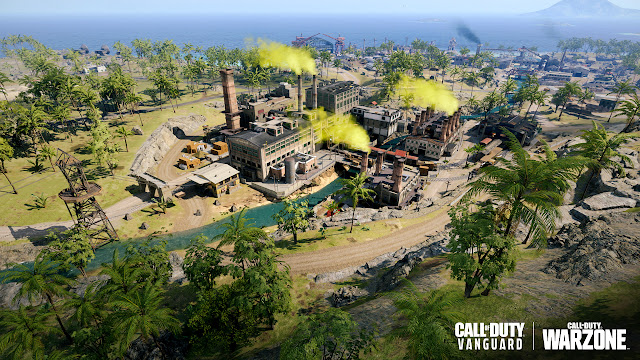
New Points of Interest: Chemical Plant and Research Labs
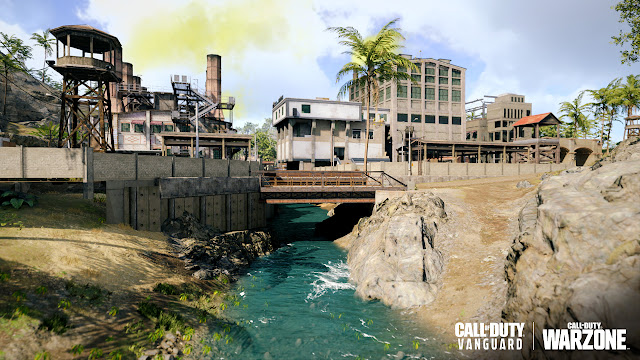
chemical plant
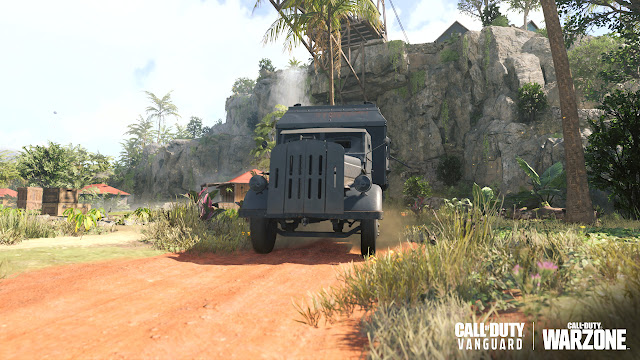
When you open the Tactics Map after the Season 2 update, you'll notice two major additions: the Chemical Plant and the Research Labs. The chemical plant (factory for short) is located mostly in quadrant F2 and empties into the northern main river of the island at F1. It is located between the docks to the northeast, the arsenal to the northwest, and at the base of the peak near the mines to the southwest.
The factory has a total of six main buildings, a small marshaling yard with several parked freight cars and a terminus in the main building, as well as several outbuildings. The complex is protected by natural rocks and two large archways on the main road that runs through it. Armed Axis guards in watchtowers protect the facility. An operator can easily get a lot of loot, contracts, and encounter opportunities throughout the complex, especially in the support structures on the east side of the river.
A team's focus, however, should be on the massive factory at its center: two multi-story structures with covered, elevated walkways connecting the two, as well as a series of external steel stairs and overhangs. Use these to maneuver between levels outdoors, or to make quick and unexpected moves within battles.
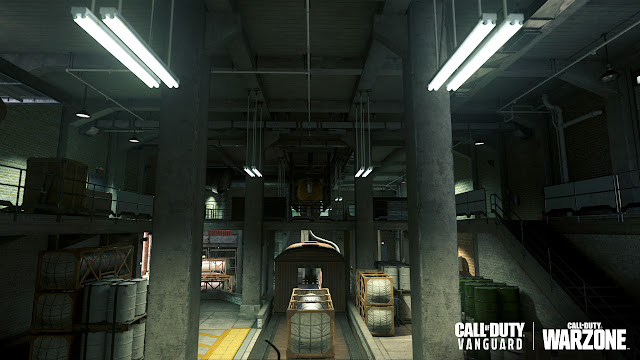
In these factory buildings, squads have a higher chance of searching the supply crates for rare items, especially those that use Nebula V or protect against this unstable chemical. These are located on the main levels of the factory, the catwalks above, the flat roofs that also serve as power generation areas, and in smaller spaces such as storerooms, administrative offices, and the control area above each factory floor.
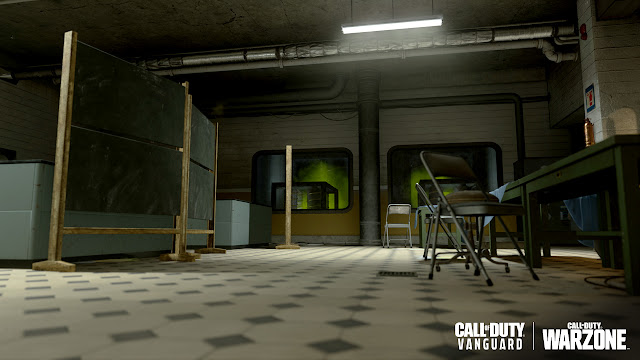
The Control Zone contains one of Season 2's many new mechanisms: a chemical trap.
Operators will find that all buttons on the panels are unresponsive except for one: a nice big red one. Interacting with it will release Nebula V-Gas on the main floor for a short time.
Because this opening mechanic has a cooldown, its effectiveness depends on timing and knowing the location of an enemy squad. However, when hit, it can become an advantage in an anti-squad fight, in addition to the obvious height advantage.
As with any new area in Warzone, a high number of visitors can be expected, at least in the first few weeks. Although airfield purists may want to return to familiar territory, the chemical plant will also likely attract those who normally head to the Peak and Arsenal after the initial drop.
research laboratories
In addition to the chemical plant, operators will also see seven yellow circles drawn on the tactics map. Each of them indicates the respective location of a hidden underground research laboratory that is rumored to be circulating.
If you find one, expect a single entry and no further escape route. Inside are numerous supply crates that can be opened to increase the chance of finding Nebula V and gas-related items. Just like the Chemical Plant, Axis soldiers patrol the site, particularly the inner tunnels.
Warzone veterans can expect to use strategies similar to those used in Verdansk and its bunkers... that is, when they find them.
Primarily, these areas are intended to be high-reward, high-risk zones in otherwise remote sections of the map. Other squads are also scouting for these labs, so plan some defenses (perhaps a squadmate or two to act as scouts) to avoid being ambushed by vulture-like rival Operators.
Enemy encounters: Axis soldiers and armored transport vehicles
These new areas are as dangerous as they are valuable to a squad's success; even if you venture into other areas of Caldera, you have to beware of some new enemies...
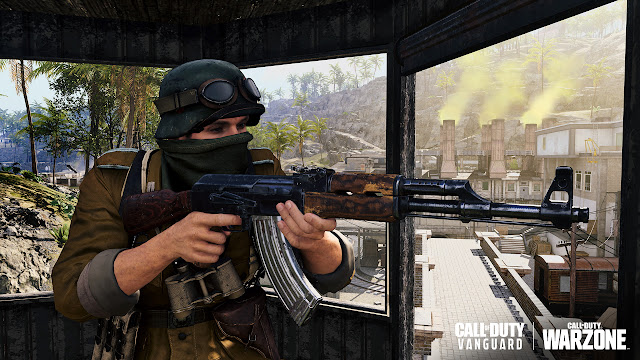
Axis soldiers
Axis soldiers aren't here to win battle royales — nor do they have the aim or skills to compete even with a standard operator — but these soldiers are ready to protect the mysteries of Nebula V.
They are located either on the chemical plant premises (usually on the watchtowers) or in the underground research laboratories. While these troopers can technically weaken and eliminate you, those Operators with proper awareness, taking cover, and shooting accurately are able to take them down faster than they could take down an armored Operator.
While they do little damage, their undamped assault rifles are sure to draw attention. They appear as pings on the tactical map, which can accidentally alert enemy squads to your position. There are two ways to deal with this:.
The first is to repeat years of training for campaign stealth missions and execute them before they can fire. A silent sniper rifle should take them down the quickest, but any suppressed weapon should do the trick.
Alternatively, you can use your itchy trigger fingers to take out enemies who want to interfere as "third parties".
Armored transport vehicles
The Axis will also deploy armored transport vehicles around Caldera, which are much more menacing compared to the regular foot soldier. They are prepared to introduce these heavy reinforcements after the first week of Season 2 should their foot soldiers be overwhelmed by the elite task force operators.
Some of these vehicles will roll out in one of six predetermined paths for each Battle Royale, e.g. B. in the mine or on a loop around the lagoon. They also have their own red truck icon on the tactics map. They cannot be stopped, but they can be destroyed by Operators willing to put in the effort (and ammo) to do so.
Aside from rolling over any Operator in their path, these vehicles have two defensive tactics: machine gun turrets and mines.
The machine gun turrets will automatically target operators in their immediate vicinity, while the mines will be placed behind trucks as they roll along. Both can deal damage, but you can dodge them: keep your distance to avoid the machine gun turrets and don't get too close.
Like Axis soldiers, the armored transport vehicles pose an environmental hazard. They can also be used as a potential distraction when fighting other squads. It's also worth trying to destroy a vehicle as they contain a ton of high-quality items... including some Nebula V weapons!
Transport modes: bomber and respawn balloon
Prepare to take to the skies with these two modes of transport. Both have their own potential strengths to enhance your Caldera traversal strategies.
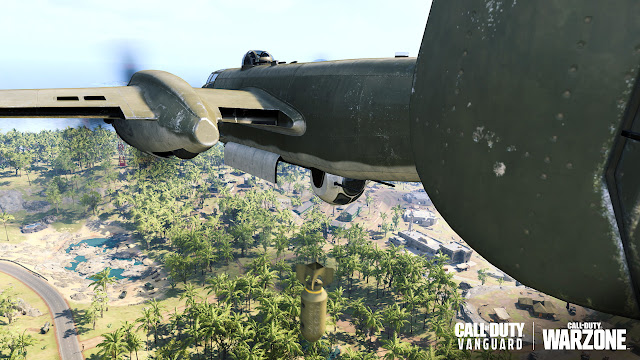
bomber
These new aircraft are here to add an extra tactical layer to Vanguard Royale.
Bombers are less maneuverable in the skies than their fighter rivals, but they have access to an explosive payload that can decimate vehicles, unmanned anti-aircraft guns, and tightly packed groups of Operators.
After takeoff, an operator can drop four bombs before taking a long time to reload. This ammunition is dropped from a compartment underneath the aircraft, which means the operator has to overfly their target while also considering forward motion and the movement of the target.
They can also destroy Supply Drops with an accurate bomb, which can fundamentally change the way Operators utilize these powerful sources of weapons and technology in Battle Royale modes.
Bombers have one glaring weakness: they are defenseless against fighter planes. Think of this dynamic as a power triangle:
- Bombers are weak against fighter planes.
- Anti-aircraft guns and vehicles are easily destroyed by bombers.
- Fighter planes are weak against anti-aircraft guns and vehicles, as they have to perform clumsy bombing maneuvers to hit targets.
When one vehicle in a Vanguard Royale seems to be more popular than another, you should look for its weakness and use it to bring the squads back to earth.
re-entry balloon
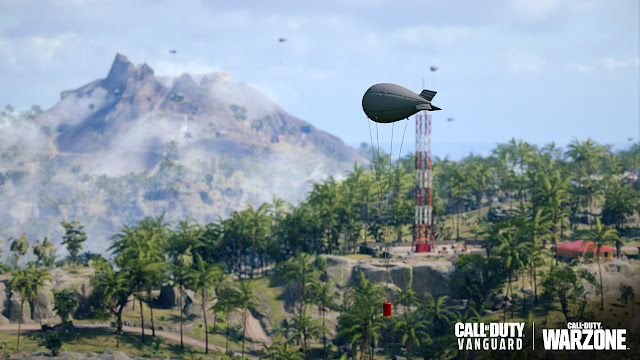
The respawn balloon is arguably the fastest way to circumnavigate Caldera, allowing the operator to get airborne at specific locations and parachute back to safety, be it a few tens or hundreds of meters away from their starting point.
Respawn Balloons are easily found with their own icon on the tactical map in places like the foothills of the peak and near Caldera's two main airstrips.
However, when using these balloons, i.e. when abseiling into the sky and during flight, the operator risks complete exposure to others. However, the ability to quickly switch positions can be well worth the peril, as leaping away from circle collapse or a bounty hunter squad can be the quickest tactic available to your team.
Respawn Balloons can be destroyed by Operators who want to limit exit strategies for other squads. Other operators can then re-inflate the balloons for a small wad of cash, which can be a good strategy when they have a surplus of funds but no other way out of a bad situation.
Another note: respawn balloons can bring down planes if their pilot carelessly rams them. So be sure to avoid them in the sky.
Portable Decontamination Station (TDS)
A new and rare field piece of equipment on Caldera, the Portable Decontamination Station is a device that filters the air for several seconds, protecting anyone in the area from the Circle Collapse or Nebula V gas.
Once set up like a trophy system, the TDS creates a fresh air bubble for a short time that prevents gas damage and reduces the visibility of both types of toxic gas. These can be used to delay rotations into the larger safe area, or they can be used in a pinch if another squad gets their hands on a Nebula V bomb.
These gadgets affect all operator tactics maps so everyone can see where they are currently active. They can also be destroyed by explosives or ballistics. When using it, a squad should know that not only will they be exposed to the gas, they will be vulnerable to a much more deadly threat on the island: their rival Operators.
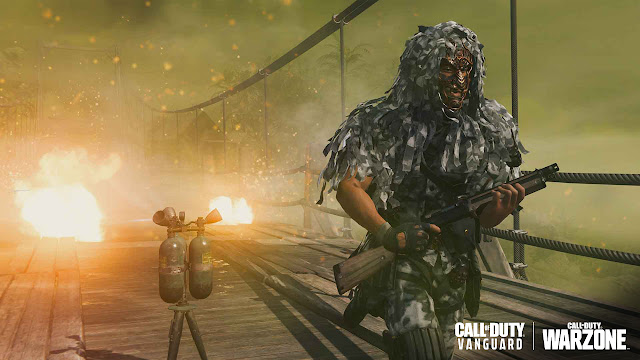
Nebula V: Ammo and Bomb field upgrades
Besides the TDS, the other two new field upgrades are based on Nebula V, the deadly gas produced in the factories around Caldera.
Nebula V Ammo
Nebula V ammo is no more powerful than regular bullets, with one important exception: when an Operator is struck down with it, it emits a cloud of toxic gas.
After activating this field upgrade, an operator loads a standard magazine of Nebula V ammo into their weapon. They can then fight an enemy as normal but will notice the cloud of gas erupting from their target as soon as they hit the ground.
Anyone attempting to revive a prone Operator (or within a few feet of them) will face circular collapse-like inconveniences: coughing, blurred vision, and light damage over time. Due to the short duration of the gas cloud and the low damage, gas masks are not triggered.
In addition, this gas cloud can reappear when Operators take additional damage from this special ammo.
Don't expect her to completely transform squad battles, as the best players often knock down all enemies before finishing them off for good. However, those looking to revive their allies before continuing the fight should watch out for this gas before releasing the trigger to perform the revive.
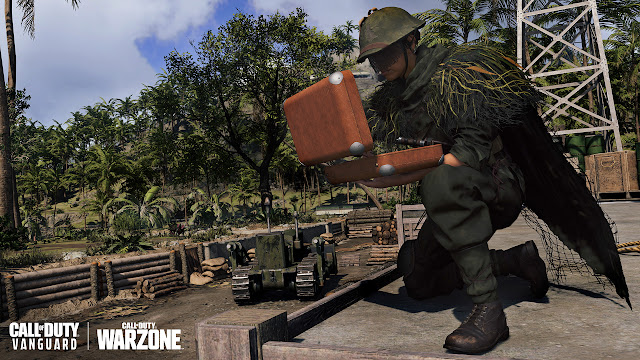
Nebula V bomb
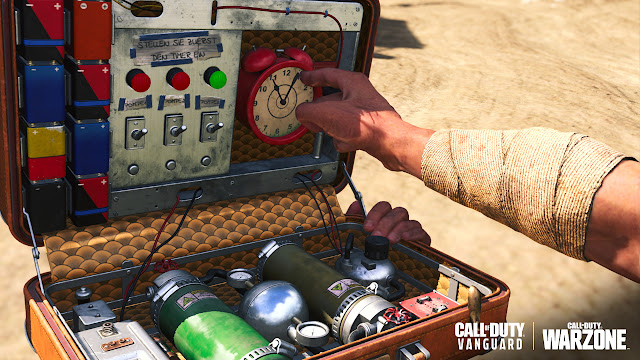
Packed with lethal gas and an explosive charge, this locked briefcase can transform the way entire squads navigate Caldera, but it's not as easy to find as Nebula V's ammo clips, being the rarest of any item found in Caldera.
The Axis powers often use armored transport vehicles to move these around the island and rumor has it they may start reopening their bomb shipments in the first week of March...
Once activated and deployed in front of an Operator, the Nebula V Bomb detonates after a set countdown and cannot be defused or destroyed. The explosion instantly deals high damage in a small radius before spreading the gas and injuring any operator without a gas mask. The gas lasts for two minutes before finally dissipating or entering the cycle collapse.
Operators can evade this explosive aftermath as well as Circle Collapse, but when it comes to area control, the Nebula V Bomb is a game-changer. Those planning to walk through the aftermath of the bomb should have a gas mask or personal decontamination station ready.
When using this bomb, a group should plan to trap their enemies between the effects of this bomb and circle collapse and limit the number of safe paths by setting additional traps. In both attack and defense against this new tool, repositioning is key. So, become familiar with their area of effect and get to know your surroundings in order to get the most out of the most powerful Axis weapon yet.
Preparing to take off: Summary of 10 tips
1. The ground is lava... or gas-filled. Stay outside the main floor of the Chemical Plant if you suspect another squad is on the catwalks. Try to use the outside stairs and platforms to get to their level; otherwise, with the Nebula V trap and high ground, they might have the advantage.
2. Down in the hatch. Research labs only have one entry and exit point. Prepare for ambushes even when other squads don't appear alongside you. Either send up a squad member or two to defend or call in a killstreak (precise airstrike or mortar fire) while inside the lab to deter enemies from above.
3. False alarms. The Axis soldiers in the Factory and Labs don't do much damage, but their undamped weapons can draw the attention of other Operators. Dodge them and take them out quickly to stay under the radar. Or make them fire when you want to distract nearby enemy troops from your actual position.
4. Detects the "spear zones" of armored transport vehicles. Instead of blind spots, these vehicles are ready to attack those who come close to them or come within a few meters. Leave enough distance between you and them to avoid their attacks. And approach them once they are destroyed to reap the rewards.
5. Rock, Scissors, Bomber Says Boom. Bombers are most effective against anti-aircraft guns and vehicles. If one starts to reduce the entire island to rubble, consider using a fighter jet against them to gain control of the skies.
6. Uses re-entry balloons for quick repositioning. Need to fly away from a circle collapse or a Nebula V bomb? Find the respawn balloons on the tactical map (or in the overworld, they're hard to miss) and rappel down them to gain some distance, at the risk of being vulnerable in the air.
7. Fall in style. Various improvements have been made to the parachutes in advance of the deployment of the respawn balloons in Caldera. Operators can now use them sooner after exiting the plane, or use them close to the ground - just not too close!
8. TDS draws attention to you Portable Decontamination Stations draw attention to you; dropping one will show your squad's position on the radar, so watch out for hungry squads ready to attack if you use them to avoid Nebula V's gas or Circle Collapse.
9. Nebula V Ammo - Lethal for squad battles. A single clip of Nebula V ammo might not seem like much, but when it takes an Operator down it makes it harder for his allies to safely revive him. Use it in group battles to prevent your opponents from regaining full strength.
10. Avoid the aftermath. Nebula V bombs create small pockets of circular, collapsing gas that is easy to spot on the tactical map. Prepare to change rotation strategies once you learn of her presence, and be on the lookout for other squads struggling to evade her for a better chance of victory.
Rise. On every front.


